




Use the manufacturer-approved charger, power the scooter off, plug the charger into the wall first (or follow your manual’s sequence), and charge in a dry, ventilated spot while you’re nearby. For daily riding, aim for a partial charge in the 20% to 80% range rather than topping off to full every night. Unplug as soon as the charger or scooter indicates completion, and if the battery ever feels hot, looks swollen, or smells off, stop and get it serviced.
TL;DR:
- Charging in a dry, ventilated area while nearby reduces safety risks, and partial charging between 20% and 80% extends battery lifespan.
- Mismatched voltage or using an unapproved universal charger can damage the battery, emphasizing the importance of using manufacturer-approved equipment.
- Charging times vary from 3 to 12 hours depending on battery capacity and charger current, with fast chargers significantly decreasing the duration at potential long-term heat costs.
- Avoid charging below 50°F and never in hot or enclosed spaces to prevent capacity loss and ensure BMS safety features function properly.
- Long-term storage requires keeping the battery at 40% to 60% charge in a cool, climate-controlled environment and regular checks during layoff periods.
Table of Contents
- How Do You Charge a Scooter Battery Safely Every Time?
- Step-by-Step Charging Procedure You Can Follow Every Time
- How Long Does It Take to Charge a Scooter Battery?
- What’s the Best Charging Routine for Daily Riding?
- Charging Safety: Temperature Limits and BMS Behavior
- Can You Charge a Scooter Battery Without the Original Charger?
- How Should You Store a Scooter Battery Long Term?
- Troubleshooting: What to Check When Your Scooter Won’t Charge
- Why Do Some Scooter Batteries Lose Range Faster Than Others?
- Publisher Perspective: The Convenience Trade-Off Riders Actually Make
- Where to Find Official Charging and Safety Guidance
- Sources
- FAQ
How Do You Charge a Scooter Battery Safely Every Time?
Every charging decision you make starts with knowing what’s actually inside your scooter. Before you touch a plug, find your battery’s chemistry, voltage, and amp-hour (Ah) rating. That data drives everything else in this guide, from charging time to daily habits to what happens if you ever need a replacement charger.
Most scooters print this information right on the battery casing or in a sticker near the deck. Look for a combination like “36V 10Ah” or “48V 13Ah” and the battery chemistry, usually lithium-ion these days, though older mobility scooters and some budget models still run sealed lead-acid batteries. If the sticker has faded, your owner’s manual or the model number stamped on the frame will get you there. Some retailers list these specs directly on product pages like the Metro Electric Scooter, 36V 500W Lithium, so you can cross-check your own numbers against a similar build.
Chemistry matters more than most riders realize:
- Lead-acid batteries tolerate overcharging better but lose capacity faster if left discharged, need periodic full charges, and generally lack a battery-management system (BMS).
- Lithium-ion batteries pack more range per pound, ship almost universally with a BMS, and actually perform worse over time if you keep them pinned at 100%.
- Voltage and Ah together set your charger requirements. A 48V system needs a 48V charger. Mismatched voltage doesn’t just fail to charge. It can damage the pack or the charger’s output circuit.
Once you know your numbers, you know your charger. That single fact eliminates most of the guesswork riders bring to charging.
Step-by-Step Charging Procedure You Can Follow Every Time
A consistent routine protects your battery and your garage. Here’s the sequence worth memorizing:
- Inspect everything first. Check the battery casing, charger housing, cable, and connector pins for cracks, corrosion, or moisture. A frayed cable or bent pin is a reason to stop, not charge.
- Power the scooter off completely. Charging a live system stresses the BMS unnecessarily and, on some models, can trigger error codes.
- Plug the charger into the wall outlet first, then connect it to the scooter, unless your manual specifies the reverse order. Some manufacturers wire their connectors to arc less when the wall side is live first; others are the opposite, so the manual overrides this default.
- Choose a non-flammable, ventilated surface. A garage floor or workbench beats a carpeted hallway or a spot blocking your only exit. Municipal fire-safety guidance specifically warns against charging lithium-ion packs in enclosed spaces or near combustibles.
- Stay close enough to notice trouble. You don’t need to hover, but charging in another room, or overnight while you sleep, removes your ability to react if something goes wrong.
- Watch the charger’s LED indicator. Most switch from red or amber to green when the charge cycle completes.
- Unplug promptly once charging finishes. Disconnect the scooter side first, then the wall side.
- Let a hot battery cool before charging. If you just rode hard in summer heat, give the pack 15 to 30 minutes to come down to room temperature before connecting the charger.
Pro Tip: Keep your charger and connector clean with a dry cloth between uses. Dust and grit in the connector pins cause more “my scooter won’t charge” service calls than actual battery failures.
How Long Does It Take to Charge a Scooter Battery?
Charging time isn’t a mystery once you know the formula. Industry guides use a simple calculation: battery Ah × percentage needed ÷ charger amps × 1.2. That final 1.2 multiplier accounts for the roughly 20% energy loss that happens as electricity converts from AC wall current to DC battery storage, plus the natural inefficiency of the charging circuit itself. Skip that factor and you’ll consistently underestimate your wait.
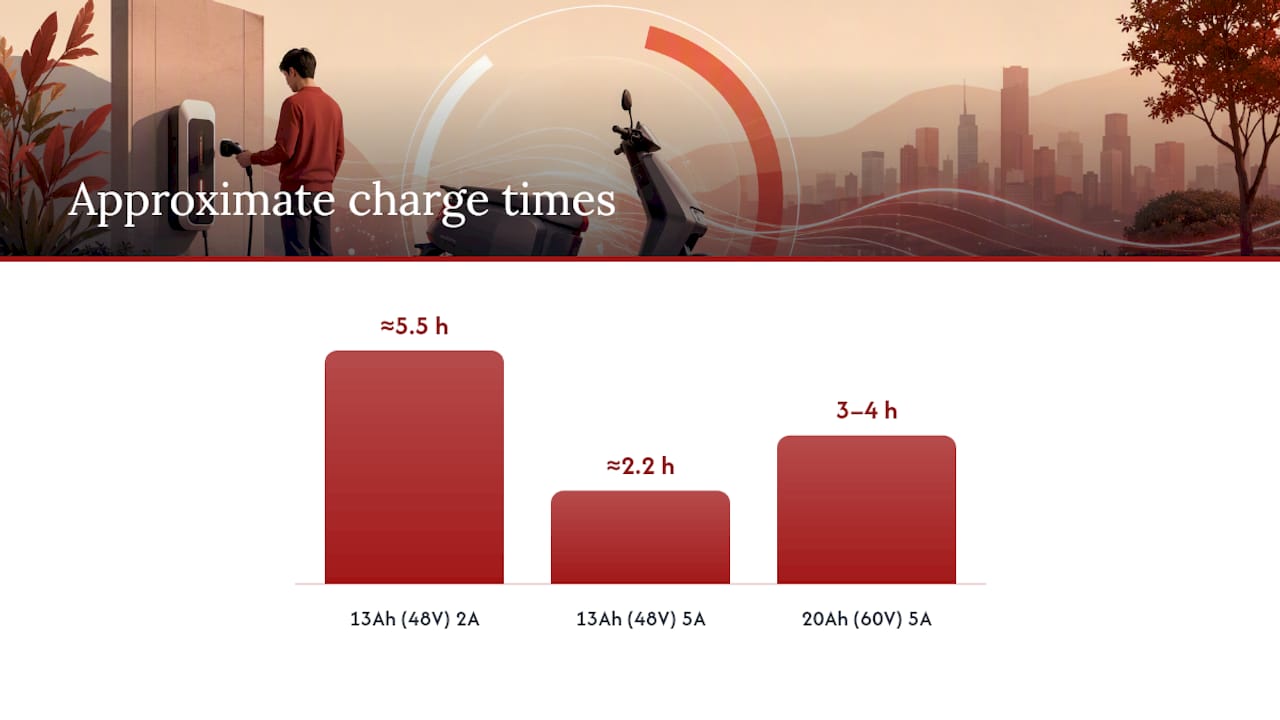
Say you own a 48V 13Ah battery that’s dropped to 30% and you’re charging with a standard 2A charger. You need to add 70 percentage points: 13 × 0.70 ÷ 2 × 1.2 equals roughly 5.5 hours. Swap in a 5A fast charger and that same session drops to about 2.2 hours, though fast charging generates more heat and adds long-term wear on the cells.
Here’s how that plays out across common setups:
| Battery capacity | Charger output | Approximate full-charge time |
|---|---|---|
| 10Ah (36V commuter) | 2A standard | several hours |
| 13Ah (48V commuter) | 2A standard | several hours |
| 20Ah (60V performance) | 3A standard | several hours |
| 20Ah (60V performance) | 5A fast charger | 3 to 4 hours |
Most full charges land somewhere in a 3 to 12 hour window depending on those two numbers. One quirk worth knowing: chargers don’t deliver current at a flat rate the whole way through. Lithium packs charge in two phases, constant current (CC) up to about 80%, then constant voltage (CV) as they top off. That CV phase tapers the current on purpose to protect the cells, which is why the last 10% to 20% of a charge often takes as long as the first 60%.
What’s the Best Charging Routine for Daily Riding?
The single habit that does more for battery lifespan than anything else is avoiding the extremes.
- Top up to 20% to 80% for routine days. This range keeps the cells in their most stable voltage window and is the target most battery longevity guides converge on.
- Charge to 100% only when you need the range, like a long commute or weekend trip, or if your manual calls for occasional full charges to let the BMS balance individual cells.
- Skip the “charge every single night” reflex. If you rode 10 miles on a 40-mile-range battery, you don’t need a full overnight session. Every-other-night charging at partial capacity is often plenty.
- Never park it empty for days. A battery sitting at 0% for an extended stretch degrades faster than one sitting at 50%.
- Match your schedule to your ride pattern, not a fixed calendar habit. Heavy daily commuters will still charge often; occasional weekend riders can stretch intervals and just check the percentage before heading out.
Depth of discharge is the real lever here. Riders chasing maximum battery life over years, not just months, build their whole routine around that one principle.
Charging Safety: Temperature Limits and BMS Behavior
Temperature does more damage to batteries than almost any other single factor, and it’s the one variable riders most often ignore. Many manufacturers specify a minimum charging temperature around 0°C (32°F). Charging a battery colder than that stresses the internal chemistry and can cause permanent capacity loss, even if the charger appears to work normally. If your scooter’s been sitting in a cold garage, bring the battery to room temperature before you plug it in.
- Ideal charging range: roughly 50°F to 80°F (10°C to 27°C) for most lithium packs.
- Avoid charging below freezing. Warm the battery indoors first if temperatures have dropped.
- Avoid charging in direct sun or hot enclosed spaces, like a car trunk in summer, where ambient heat compounds the heat the charging process itself generates.
Your battery-management system is doing more work behind the scenes than most riders appreciate. A modern BMS monitors individual cell voltage, temperature, and current, and it will cut off charging automatically if something drifts outside safe limits. That auto-shutoff behavior is a real safety net, but it’s not a reason to walk away and forget about a charging pack entirely. Fire department guidance specifically recommends staying nearby and awake while lithium-ion batteries charge, precisely because a BMS failure or physical damage to the pack can bypass those protections.
If a battery is hot to the touch, swollen, leaking, or giving off an unusual smell, treat it as an emergency, not a nuisance:
- Unplug it immediately if it’s safe to reach the connection without touching the pack itself.
- Move it outdoors or away from combustibles if you can do so safely.
- Ventilate the area and don’t attempt to open or “fix” a swollen pack yourself.
- Call the manufacturer or a qualified powersports technician rather than continuing to use or charge it.
Can You Charge a Scooter Battery Without the Original Charger?
A charger that plugs in doesn’t mean it’s the right charger. Voltage, polarity, current output, and communication protocol between the charger and the BMS all need to match, and a connector that physically fits tells you nothing about whether those four things line up.
The Consumer Product Safety Commission’s guidance on untested universal chargers is blunt about this: a matching plug doesn’t guarantee safe voltage or proper cutoff behavior. A universal charger that outputs the wrong voltage can overcharge a pack the BMS wasn’t designed to regulate against, or undercharge it so slowly that you assume the battery is failing when it’s really the charger. This partner breakdown of charger types and how they differ is worth a read if you’re trying to understand what separates a safe replacement from a gamble.
Car chargers and generic USB power banks are not substitutes, full stop. A car’s 12V outlet doesn’t match most scooter battery voltages, and the current delivery isn’t regulated the way a purpose-built scooter charger’s is.
Safer paths if your original charger is lost, broken, or you want a backup:
- Buy a manufacturer-approved replacement charger matched to your exact model and voltage. Gokartsusa’s parts listings, including options like the Electric Scooter Throttle page for related electrical components, are a good starting point for tracking down model-correct parts.
- Use a certified fast charger only if your manual explicitly supports it. Not every pack is built to handle higher current safely.
- Verify specs before using a portable power station as a charging source, confirming output voltage and current match your battery’s requirements exactly.
How Should You Store a Scooter Battery Long Term?
Winter storage or any layoff longer than a few weeks calls for a different charging target than daily riding.
- Check the battery every 1 to 2 months during storage and top it back up to that 40% to 60% band if it’s drifted lower.
- Never store fully charged in a hot garage or attic. Heat plus a full charge is the combination that accelerates capacity loss fastest.
- Never leave it fully depleted for weeks. A deeply discharged lithium cell sitting untouched can drop into a state where the BMS won’t safely recharge it at all.
- Aim for storage temperatures between 50°F and 68°F (10°C to 20°C) when possible. A basement or climate-controlled closet beats an uninsulated shed.
- Before returning to regular use, inspect the connector for corrosion, check tire pressure and brakes, and run a full charge cycle to confirm the pack still holds capacity normally.
If you’re storing a higher-voltage model, like a 60V system similar to the Thor Electric Scooter, 60V 2400W Lithium, the same 40% to 60% principle applies regardless of the pack’s total capacity.
Troubleshooting: What to Check When Your Scooter Won’t Charge
When a scooter refuses to charge, the fix is almost always simpler than a dead battery. Work through these checks in order before assuming the worst:
- Confirm the wall outlet works by plugging in another device. A dead outlet or tripped breaker is a common, embarrassing culprit.
- Try a different outlet entirely, ideally on a different circuit, to rule out a household wiring issue.
- Inspect the connector pins on both the charger and the scooter for corrosion, bent pins, or debris, and clean gently with a dry cloth or contact cleaner if needed.
- Check the charger’s output with a multimeter if you have one, comparing the reading against the voltage printed on the charger’s label.
- Watch the LED behavior closely. A light that never turns on, blinks erratically, or stays red indefinitely without progress usually points to either a failed charger or a battery the BMS has locked out.
- Try a known-good charger from the same model, if you have access to one, to isolate whether the charger or the battery is at fault.
Some symptoms mean stop immediately rather than keep troubleshooting: a battery that’s visibly swollen, hot beyond what normal charging produces, emitting smoke or a chemical smell, or one that consistently shows undervoltage even after a full charge cycle. None of those are DIY fixes. They’re signs the pack itself has degraded past safe use and needs professional evaluation or replacement.
As a rule of thumb, a charger is the cheaper and more likely failure point, while a pack that won’t hold voltage after a confirmed-good charger is applied usually means it’s time to shop for a replacement battery rather than chase the problem further.
Why Do Some Scooter Batteries Lose Range Faster Than Others?
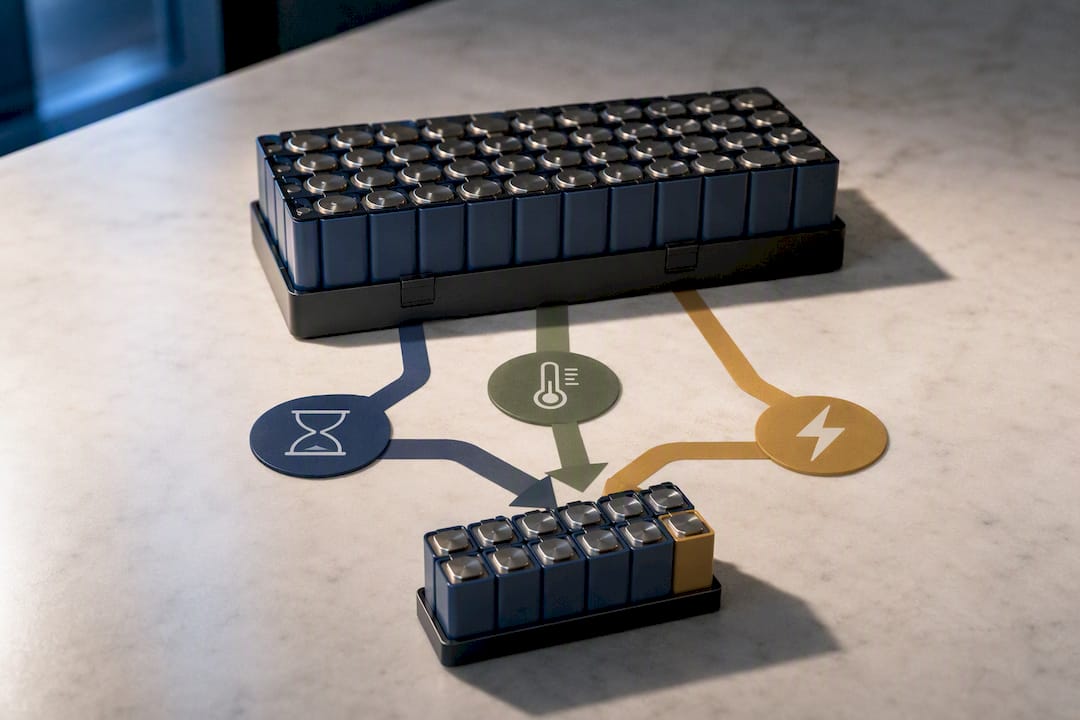
Range loss almost always traces back to one of three causes: age, environment, or how the pack is charged. A lithium battery loses capacity gradually with every charge cycle, and in a multicell pack, the weakest single cell drags down the whole group’s usable range, since the BMS balances to the weakest link rather than the strongest.
Cold weather temporarily reduces usable range even in a healthy battery, since lithium chemistry simply performs less efficiently below room temperature. Heat does long-term damage instead, quietly reducing maximum capacity over months of exposure. Aggressive acceleration, hill climbing, and heavier rider weight all pull more current per mile, which shows up as shorter range on the same charge, not battery failure.
Simple mitigations help more than most riders expect. Avoid extreme heat exposure when parking, keep tire pressure at spec since underinflated tires increase rolling resistance and current draw, and moderate acceleration on hills when range matters more than speed. To test actual capacity, fully charge the battery, then ride a known distance at a consistent speed and compare the range against the original spec.
Publisher Perspective: The Convenience Trade-Off Riders Actually Make
Real life means plugging in overnight because that’s when you remember, not because it’s optimal. The gap between best practice and actual practice is where most battery complaints come from. They’re doing what’s convenient, and convenience has a cost measured in cycles, not dollars.
That single adjustment costs you nothing in daily convenience and buys back a meaningful chunk of long-term capacity.
If you’re shopping for a replacement charger or battery to fit a model like the Free Ride Electric Scooter, 48V 600W Lithium, match the voltage and Ah rating exactly before anything else. That’s the detail that prevents most charging headaches before they start.
— Mario
Where to Find Official Charging and Safety Guidance
For rules specific to your model, your owner’s manual is always the final word on charging temperature, connection order, and charger compatibility. Beyond that, the FDNY’s lithium-ion battery safety advisory covers fire-risk basics every rider should know, while independent guides like Street Rides’ battery care guide and Dynamic Scooter’s charging-time breakdown go deeper into charger specs and timing math.
Ready to gear up for your next ride? Browse powersports lineups, including the Sport Kart Kids Gas Go Kart, and check out replacement parts and accessories built to keep your fleet running strong.
Sources
- FDNY — Lithium-ion batteries: safety tips for retailers & consumers
- How To Correctly Charge An Electric Scooter And What Silently Kills Your Battery - Scooter Planet
- How long does it take to charge an electric scooter? Quick guide (2026) - Dynamic Scooter
FAQ
What Is the Best Way to Charge a Scooter Battery?
Use the manufacturer-approved charger, power the scooter off first, plug the charger into the wall before connecting it to the scooter (unless your manual says otherwise), and charge in a ventilated area while you’re nearby.
How Do You Get a Dead Scooter Battery to Charge Again?
Start by confirming the charger itself works in a different outlet, then inspect the connector for corrosion or debris and clean it. If the LED shows no response at all, the battery’s BMS may have locked out from a deep discharge, in which case a manufacturer or qualified repair technician can determine if it’s recoverable or needs replacement.
Can You Charge a Scooter Battery Without the Original Charger?
Only with a replacement charger that matches your battery’s exact voltage, current rating, and communication protocol with the BMS. A connector that physically fits the port is not enough. The CPSC has warned against untested universal chargers because a matching plug doesn’t guarantee safe voltage or proper shutoff behavior.
Can You Charge a Scooter Battery With a Car Charger?
No. A car’s 12V outlet almost never matches a scooter battery’s voltage requirement, and the current delivery isn’t regulated the way a dedicated scooter charger’s is, which risks damaging the pack or the vehicle’s electrical system.
How Long Does a Full Scooter Battery Charge Take?
Most scooters take roughly 3 to 12 hours depending on battery capacity and charger output, with many standard commuter models landing in the 4 to 8 hour range. You can estimate your own charge time using battery Ah times the percentage needed, divided by charger amps, then multiplied by 1.2 to account for charging losses.