


Every parent faces the challenge of balancing fun and safety when choosing a mini bike for their child. The right entry-level bike can spark outdoor adventure and family bonding, but only if it fits your child’s size and skill level. By focusing on proper fit and safety gear, you set your child up for confident, controlled rides and lasting enjoyment. This guide walks you through each step, from selecting a bike to teaching safe riding habits, so your child can experience the thrill of the ride—and you can worry less.
Table of Contents
- Step 1: Evaluate The Right Mini Bike For Your Child
- Step 2: Assemble And Inspect Your Mini Bike Safely
- Step 3: Teach Basic Riding And Safety Techniques
- Step 4: Test Ride And Supervise Outdoor Use
Quick Summary
| Key Message | Explanation |
|---|---|
| 1. Choose the right mini bike | Match the bike to your child’s age, height, and skill level for safety and comfort during rides. |
| 2. Proper assembly is crucial | Carefully assemble and inspect the bike to ensure all components are secure and functioning well. |
| 3. Teach safety and control first | Focus on basic riding skills and safety techniques to build confidence before challenging maneuvers. |
| 4. Supervise outdoor riding | Always supervise your child’s rides, especially in new environments, to ensure their safety and confidence. |
| 5. Use appropriate safety gear | Ensure your child wears a helmet and reflective clothing every ride to enhance visibility and protection. |
Step 1: Evaluate the Right Mini Bike for Your Child
Choosing the right mini bike means matching your child’s age, size, and skill level to a machine that fits them properly and keeps them safe. This step is where you’ll learn to separate hype from what actually works for your family.
Start by checking your child’s age and physical dimensions. Mini bikes come in different frame sizes and engine capacities designed for specific age groups. A six-year-old needs a completely different bike than a twelve-year-old, not just in power but in how the controls feel under their hands.
Measure your child’s height and inseam to compare against the mini bike’s specifications. Your child should be able to touch the ground with their toes when seated on the bike. This matters more than you’d think, because a bike that’s too tall creates panic when they need to plant their feet quickly.
Here are the key measurements to evaluate:
- Seat height: Your child’s legs should have a slight bend at the knee when seated
- Handlebar reach: Arms should bend comfortably without stretching or feeling cramped
- Foot pegs and controls: All controls should be within easy reach without straining
- Weight capacity: The bike should accommodate your child’s current weight plus growth room
Consider your child’s riding experience level. A beginner needs a bike that’s forgiving and easy to control, while understanding age-appropriate youth go-kart options helps you navigate what features matter at different developmental stages. Look for bikes with automatic transmissions if your child is new to riding, as they eliminate clutch coordination and let them focus on balance and steering.
Here’s a quick reference for matching mini bike types to age groups and skill levels:
| Age Range | Engine Size | Best for Skill Level | Recommended Features |
|---|---|---|---|
| 6-8 years | 49-70cc | Beginners | Automatic transmission, low seat |
| 9-11 years | 70-110cc | Intermediate | Adjustable handlebars, electric start |
| 12+ years | 110-125cc | Experienced | Manual gears, larger wheels |
Think about where you’ll actually ride. Neighborhood streets need different bikes than trails or open fields. Local regulations also matter, so check if your area has restrictions on mini bike engine size or where you can legally operate one.
The perfect mini bike feels like an extension of your child’s body, not a machine they’re wrestling to control.
Test ride options whenever possible. Many dealerships let kids sit on different models to get a feel for what works. Your child’s comfort and confidence matter far more than impressive specs on paper.
Pro tip: Start with a bike your child can grow into slightly rather than one they’ve already outgrown, but never sacrifice proper seat and handlebar positioning for size potential. An uncomfortable reach leads to poor control and crashes.
Step 2: Assemble and Inspect Your Mini Bike Safely
Most mini bikes arrive partially assembled, and getting this step right makes the difference between a safe, fun machine and a dangerous liability. You’ll handle final assembly, tighten critical components, and conduct a thorough safety check before your child ever throws a leg over the bike.
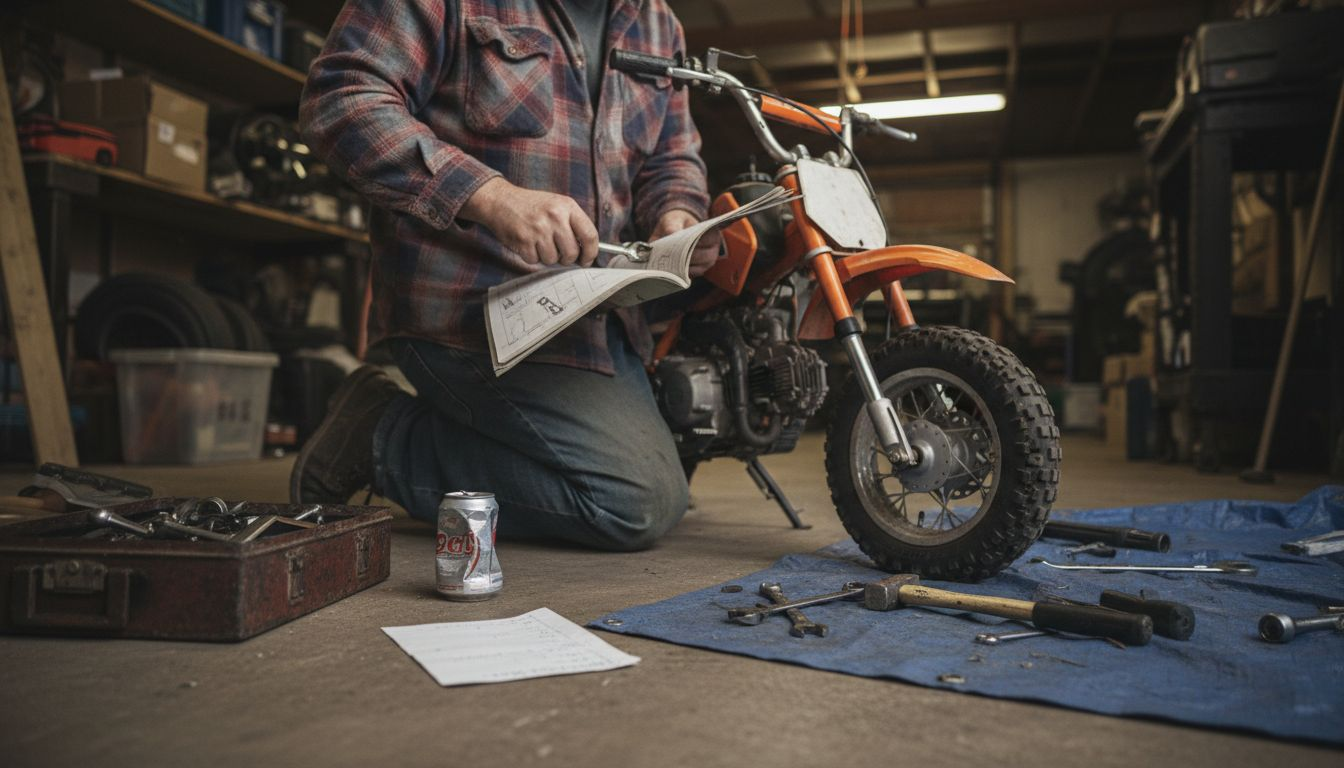
Start by unpacking everything and laying out all parts in a clean, organized space. Check the documentation to understand what assembly level your bike has. Many mini bikes ship at 95% or 98% assembly, meaning the frame, engine, and major components are already installed, but you’ll need to attach handlebars, wheels, pedals, and other finishing pieces.
Gather your tools before you begin. You’ll need wrenches in various sizes, screwdrivers (both Phillips and flathead), and a torque wrench if you want precision. Having everything ready prevents frustration and ensures you don’t skip steps because a tool isn’t nearby.
Follow the manufacturer’s assembly instructions carefully. Install handlebars first, then attach both wheels, making sure they’re centered and spin freely. Attach foot pegs and any safety equipment like mirrors or reflectors that came with your bike.
Here’s what requires your careful attention during assembly:
- Tighten all fasteners: Bolts and screws vibrate loose during riding, so ensure everything is snug but not over-tightened
- Check alignment: Wheels should spin straight without rubbing, and handlebars should move smoothly
- Inspect for damage: Look for cracks, loose welds, or bent components before assembly
- Verify brake operation: Squeeze both brake levers and confirm pads contact the wheel or disc properly
Once assembly is complete, conduct a thorough pre-ride safety inspection covering tire pressure, brake functionality, and overall component tightness. Underinflated tires make the bike harder to control, while weak brakes create dangerous stopping distances.
Start the engine and listen for unusual sounds. Let it idle briefly, then turn it off and check for leaks around the engine and fuel tank. A small amount of seepage during initial operation is sometimes normal, but large puddles indicate problems that need attention before riding.
A mini bike that runs perfectly but isn’t properly assembled is more dangerous than one that needs tuning but is mechanically sound.
After the first short test ride in a safe area, inspect the bike again. Vibration from initial operation sometimes loosens components, so retighten everything and recheck brakes and tires.
Pro tip: Keep the assembly manual and a basic tool kit handy for the season, as you’ll need to retighten fasteners periodically and make minor adjustments as your child grows and the bike settles into regular use.
Step 3: Teach Basic Riding and Safety Techniques
Your child’s first rides set the foundation for a lifetime of safe, confident riding. This step focuses on teaching fundamental skills, building proper habits, and establishing the mindset that safety comes before speed or tricks.
Start in a completely flat, open area with no traffic, obstacles, or distractions. A quiet parking lot or empty field works perfectly. Your child needs space to make mistakes without consequences and time to develop muscle memory for basic controls without worrying about surroundings.
Begin with the fundamentals. Have your child practice mounting and dismounting correctly, gripping the handlebars with both hands, and using both feet as anchors when stopped. These basics prevent panic and build confidence before the bike even moves.
Teach throttle control before anything else. Have your child sit on the stationary bike and gently twist the throttle, getting a feel for how much grip translates to acceleration. This should be boring and methodical, not thrilling. Once they’re comfortable with light throttle input, have them practice in short, straight lines across your practice area.
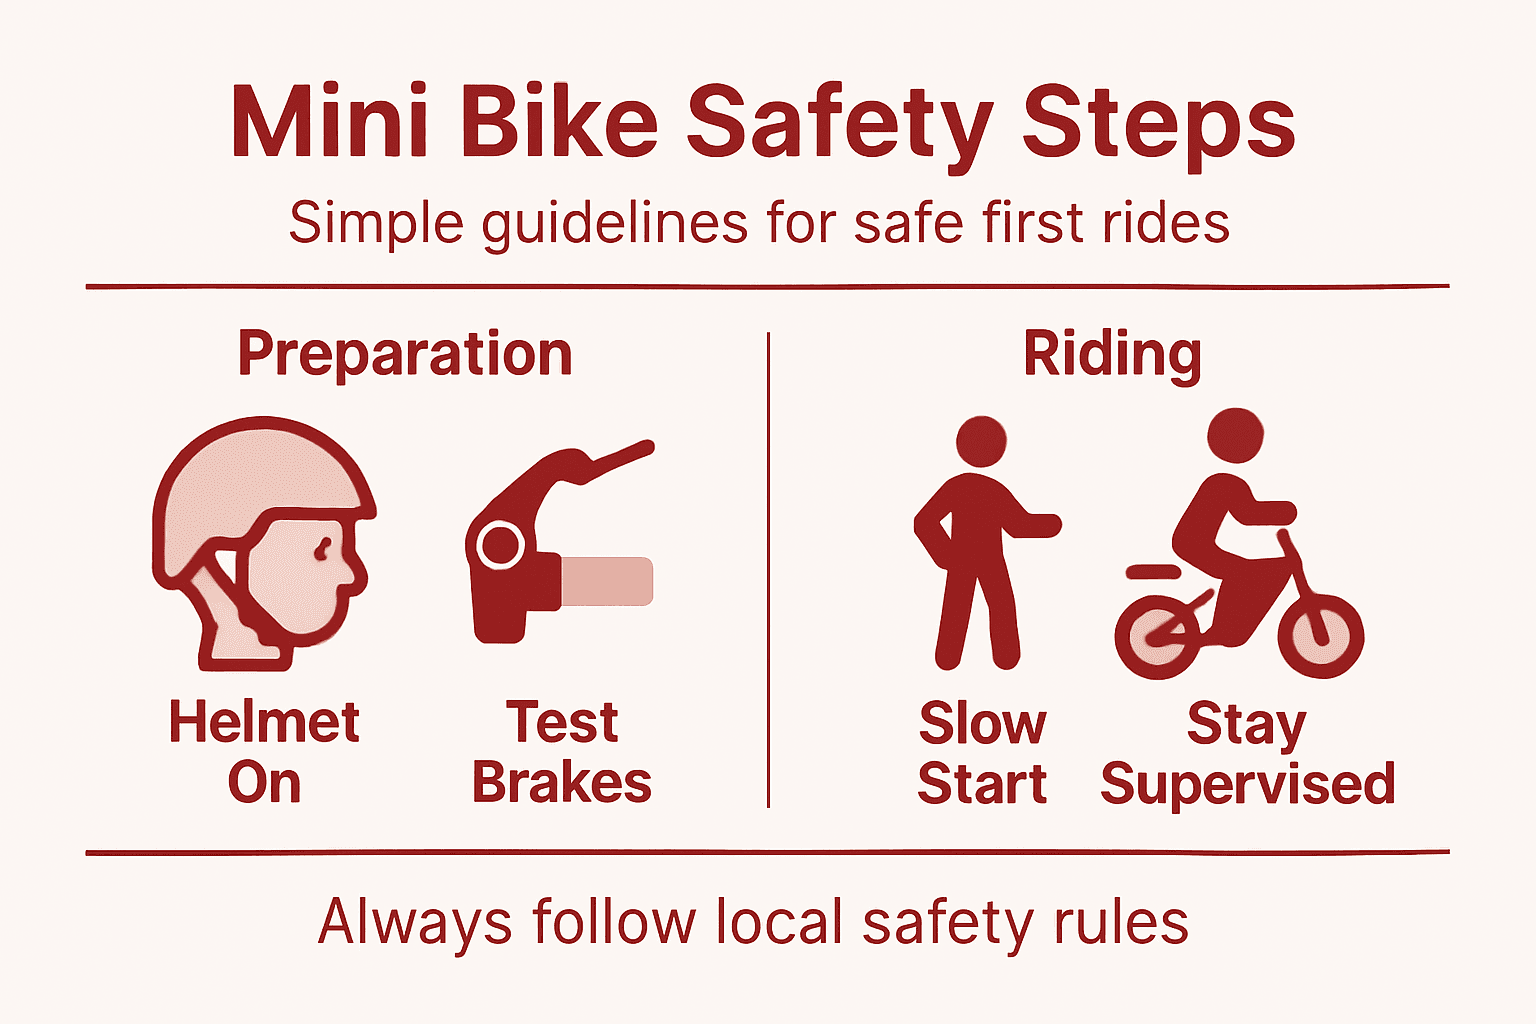
Helmet use is non-negotiable from the very first moment. A properly fitted helmet provides critical head protection that prevents serious injury in falls. Make wearing a helmet as automatic as getting dressed, never negotiable or optional.
Introduce braking next. Have your child practice gentle braking while moving slowly, learning how the bike responds. They should understand that braking harder doesn’t always mean stopping faster, especially on loose surfaces. Emphasize smooth inputs rather than grabbing the brakes in panic.
Key safety techniques to establish early:
- Hand signals: Practice pointing left and right before turning, building the habit of communicating movement
- Looking ahead: Teach your child to scan 10 to 15 feet ahead, not staring at the ground directly in front of the wheel
- Body positioning: Correct posture keeps weight centered and improves control
- Predictable riding: Smooth, steady movements are safer than jerky or erratic inputs
Wear bright or reflective clothing during all rides so your child is visible to others. This matters even in quiet practice areas because the habit will carry into real-world riding situations.
During early sessions, stay close enough to offer immediate guidance but far enough to let your child experience independent control. Your calm presence matters more than constant correction.
The goal isn’t to teach your child tricks or speed, it’s to build muscle memory for safe, controlled riding that becomes automatic.
Always supervise riding sessions and establish clear boundaries about where your child can ride. No riding on busy streets, no riding alone, and no riding after dark until they’ve demonstrated consistent safety awareness.
Pro tip: Record short video clips of your child riding in safe conditions, then review them together to point out what they’re doing well and where improvements help, making feedback constructive and positive rather than critical.
Step 4: Test Ride and Supervise Outdoor Use
Your child’s first outdoor rides matter enormously. This step walks you through conducting safe test rides, gradually expanding riding environments, and maintaining the supervision level that keeps them protected while building independence.
Start with a short test ride in your practice area before venturing anywhere new. Even if your child rode perfectly during training sessions, the bike needs real-world verification. Listen for engine issues, check brake performance under actual conditions, and confirm all controls respond smoothly.
Keep initial outdoor rides short, maybe 15 to 20 minutes. Your child’s focus and muscle endurance are still developing, and fatigue leads to mistakes. A successful short ride builds confidence far better than an exhausting long one that ends in frustration.
Choose safe riding locations carefully. Quiet residential streets with light traffic work better than busy roads. Empty parking lots, parks with dedicated paths, or private property with permission offer controlled environments where your child can ride without dodging cars or pedestrians.
Adult supervision during outdoor rides is absolutely essential. Stay close enough to intervene immediately if your child loses control or gets disoriented. This doesn’t mean hovering, but rather riding nearby or walking alongside, positioned where you can see what your child sees.
Wear the complete safety gear every single ride. Proper safety equipment including helmets and reflective clothing protects against serious injury from falls, impacts, or collisions. Make this non-negotiable from the first outdoor session.
Below is a checklist comparing essential safety gear and its key purpose for outdoor mini bike riding:
| Safety Gear | Protection Provided | Importance Level |
|---|---|---|
| Helmet | Prevents head injuries | Critical |
| Gloves | Shields hands from abrasion | High |
| Reflective clothing | Enhances visibility | High |
| Knee/elbow pads | Guards joints from impacts | Medium |
What to monitor during supervised outdoor rides:
- Throttle control consistency: Is your child smooth or jerky with acceleration?
- Braking awareness: Do they brake early and gently, or late and hard?
- Line choice: Are they tracking straight or drifting unexpectedly?
- Situational awareness: Do they notice obstacles, changes in terrain, or potential hazards?
- Fatigue signs: Watch for wavering lines, slower responses, or loss of focus
Gradually expand riding areas as your child demonstrates consistent safety awareness. Progress from empty lots to light residential streets, then to parks with gentle terrain. Each new environment teaches different skills.
Establish clear rules about where your child can ride independently and where they need supervision. No riding near water, heavy machinery, or other hazards. No riding alone until they’ve demonstrated consistent judgment and control across varied situations.
Supervision isn’t babying your child, it’s being their pit crew, watching for hazards they haven’t learned to recognize yet and intervening before mistakes become crashes.
Always have a plan for what to do if your child crashes or gets hurt. Know where the nearest first aid supplies are, understand what injuries require medical attention, and stay calm if something happens.
Pro tip: Set riding sessions on a consistent schedule so your child anticipates practice time and builds routine around safety habits, rather than treating riding as a spontaneous activity where corners get cut.
Find the Perfect Mini Bike and Gear for Your Child’s Safe Riding Journey
Choosing the right mini bike and ensuring your child rides safely can feel overwhelming. You want a bike that fits your child’s size and skill level, with features like automatic transmission and proper safety gear. This guide helps you avoid common pitfalls like uncomfortable seat height or poorly assembled bikes that can dampen the fun and increase risks.
At GokartsUSA.biz, we understand these challenges and offer a wide selection of mini bikes tailored for beginners and youth riders. Explore bikes designed for safe, confident learning complete with adjustable handlebars and easy-to-use controls. Plus, find essential accessories such as helmets and protective gear all in one place to keep your child protected from day one.

Start your safe riding adventure today by browsing our beginner-friendly mini bikes and gear. Don’t miss out on our spring sales and free shipping offers to get the best value while prioritizing your child’s safety. Visit GokartsUSA.biz now and equip your young rider with the perfect mini bike and safety essentials to enjoy every ride with confidence.
Frequently Asked Questions
What mini bike size is suitable for my child?
Choosing the right mini bike size for your child depends on their age, height, and skill level. Measure their height and inseam to ensure they can touch the ground with their toes when seated on the bike, promoting confidence and control.
How can I ensure my mini bike is assembled safely?
Make sure to follow the manufacturer’s assembly instructions carefully, tightening all bolts and screws to avoid any safety hazards. Inspect for proper alignment and functionality after assembly, and conduct a pre-ride safety check to confirm everything is in working order before your child rides.
What basic riding techniques should I teach my child?
Start by teaching your child proper mounting and dismounting techniques, throttle control, and braking awareness. Practice in a flat, open area to build their confidence and muscle memory in a low-pressure environment.
How can I supervise my child effectively during outdoor rides?
Maintain close proximity to your child while they ride, allowing for quick intervention if needed. Monitor their control, braking techniques, and situational awareness to ensure they are riding safely and making good decisions.
What safety gear is essential for mini bike riding?
Essential safety gear includes a properly fitted helmet, gloves, and reflective clothing for visibility. Always ensure your child wears this gear for every ride to provide maximum protection against falls and collisions.
How should I handle the first crash or injury?
Stay calm and approach the situation methodically; check your child for injuries and provide first aid if necessary. Have a plan in place for communicating with them about what happened and how to improve safety in future rides.
Recommended
- What Is an Adult Mini Bike and Why It Matters – GoKarts USA®
- Beginner’s Guide Go Karting: Safe Entry-Level Fun for Kids – GoKarts USA®
- How to Choose Go-Kart for Kids: Safe Buying Guide – GoKarts USA®
- Tips for Starting a New Engine – GoKarts USA®
- 7 Essential Golf Beginner Tips for UK Players – More Sports