


Picture this: you’re ready for a weekend trail ride, but your mini bike sputters and dies halfway through. Most breakdowns trace back to skipped maintenance, not mechanical failure. This guide walks you through simple, family-friendly steps to keep your mini bike safe, reliable, and ready for adventure. You’ll learn exactly what to check, when to do it, and how to avoid common mistakes that lead to costly repairs.
Table of Contents
- Key Takeaways
- Prerequisites And Tools Needed
- Cleaning, Lubrication, And Inspection Steps
- Engine, Fuel System, And Electrical Maintenance
- Brake, Tire Care And Common Maintenance Mistakes To Avoid
- Expected Maintenance Effort, Cost, And Benefits
- Discover Quality Mini Bikes And Accessories At GoKarts USA®
- Frequently Asked Questions
Key Takeaways
| Point | Details |
|---|---|
| Routine checks reduce injury risk by over 50% | Regular maintenance prevents brake failures, tire blowouts, and chain breaks that cause accidents. |
| Clean and lubricate chain after every ride | This single step prevents 40% of premature wear and keeps power transfer smooth. |
| Inspect brakes and tires monthly | Monthly checks catch worn pads and low pressure before they become safety hazards. |
| Charge battery during inactivity | Charging every 4 weeks extends electric mini bike battery lifespan by 20%. |
| Use proper torque to avoid stripped threads | Over-tightening causes 20% of amateur maintenance failures; follow torque specs. |
Prerequisites and Tools Needed
Before you start wrenching, gather your supplies and set up a proper workspace. You don’t need professional mechanic skills or expensive equipment. A basic tool kit and some common supplies will handle 90% of mini bike maintenance tasks.
Here’s what you need:
- Socket set (metric, 8mm to 17mm)
- Phillips and flathead screwdrivers
- Adjustable wrench
- Chain lubricant designed for powersports
- Degreaser or chain cleaner
- Tire pressure gauge
- Cleaning brushes and microfiber cloths
- Oil catch pan
- Replacement air filter (model-specific)
Pro Tip: Keep a dedicated maintenance bin with all your tools and supplies in one place. This saves time hunting for that missing socket when you’re ready to work.
Safety gear matters just as much as tools. Wear gloves to protect your hands from sharp edges and hot components. Eye protection prevents dirt and degreaser from splashing into your eyes during cleaning. Understanding mini bikes safety overview helps you appreciate why proper maintenance directly impacts rider protection.
Set up your workspace in a well-lit garage or driveway with good ventilation. Lay down cardboard or a tarp to catch drips and keep parts organized. A stable workbench or milk crate provides a clean surface for small components. Check your beginner’s mini bike guide to identify your bike’s specific maintenance points before starting.
| Tool Category | Specific Items | Estimated Cost |
|---|---|---|
| Hand Tools | Socket set, wrenches, screwdrivers | $30 to $50 |
| Cleaning Supplies | Degreaser, brushes, cloths | $15 to $25 |
| Lubricants | Chain lube, penetrating oil | $10 to $20 |
| Safety Gear | Gloves, safety glasses | $10 to $15 |
Different mini bike types require slightly different approaches, but the core maintenance steps remain consistent. Gas-powered models need more attention to fuel systems and air filters, while electric versions focus on battery and electrical connections.
Cleaning, Lubrication, and Inspection Steps
Cleaning isn’t just about appearances. Dirt and grime accelerate wear, hide damage, and trap moisture that causes rust. Start every maintenance session with a thorough cleaning to reveal what needs attention.
Follow these steps in order:
- Spray degreaser on the chain, sprockets, and engine case, letting it sit for 2 to 3 minutes.
- Scrub away buildup with a stiff brush, paying attention to tight spaces around pivot points.
- Rinse with clean water or wipe down with damp cloths, avoiding electrical components.
- Dry all metal surfaces completely with microfiber cloths to prevent flash rust.
- Apply chain lubricant while slowly rotating the rear wheel to coat every link evenly.
- Wipe down the frame, fenders, and handlebars to remove fingerprints and road film.
Pro Tip: Clean your mini bike immediately after muddy or dusty rides. Waiting allows dirt to harden and become much harder to remove.
Lubricating the chain and pivot points after cleaning reduces wear by up to 40%. This step takes five minutes but dramatically extends component life. Use lubricant specifically designed for powersports chains, not WD-40 or household oils that attract dirt.
During cleaning, inspect every component you touch. Look for these warning signs:
- Cracked or dry-rotted tires
- Loose bolts or fasteners
- Worn brake pads thinner than 3mm
- Chain with tight spots or excessive slack
- Frayed cables or kinked lines
- Leaking fluids under the engine or forks
Check tire pressure with a gauge before every ride. Most mini bikes run best at 20 to 30 PSI, but verify your model’s specs in the owner’s manual. Under-inflated tires reduce handling and increase puncture risk, while over-inflation makes the ride harsh and decreases traction.

Refer to mini bike cleaning tips for model-specific cleaning techniques. Some bikes have sealed bearings that don’t need additional lubrication, while others require grease gun service every few months. Following proper engine care advice prevents contamination during the cleaning process.
Engine, Fuel System, and Electrical Maintenance
Your mini bike’s power plant needs regular attention to run efficiently and last for years. Engine maintenance focuses on three key areas: air intake, fuel delivery, and ignition systems.
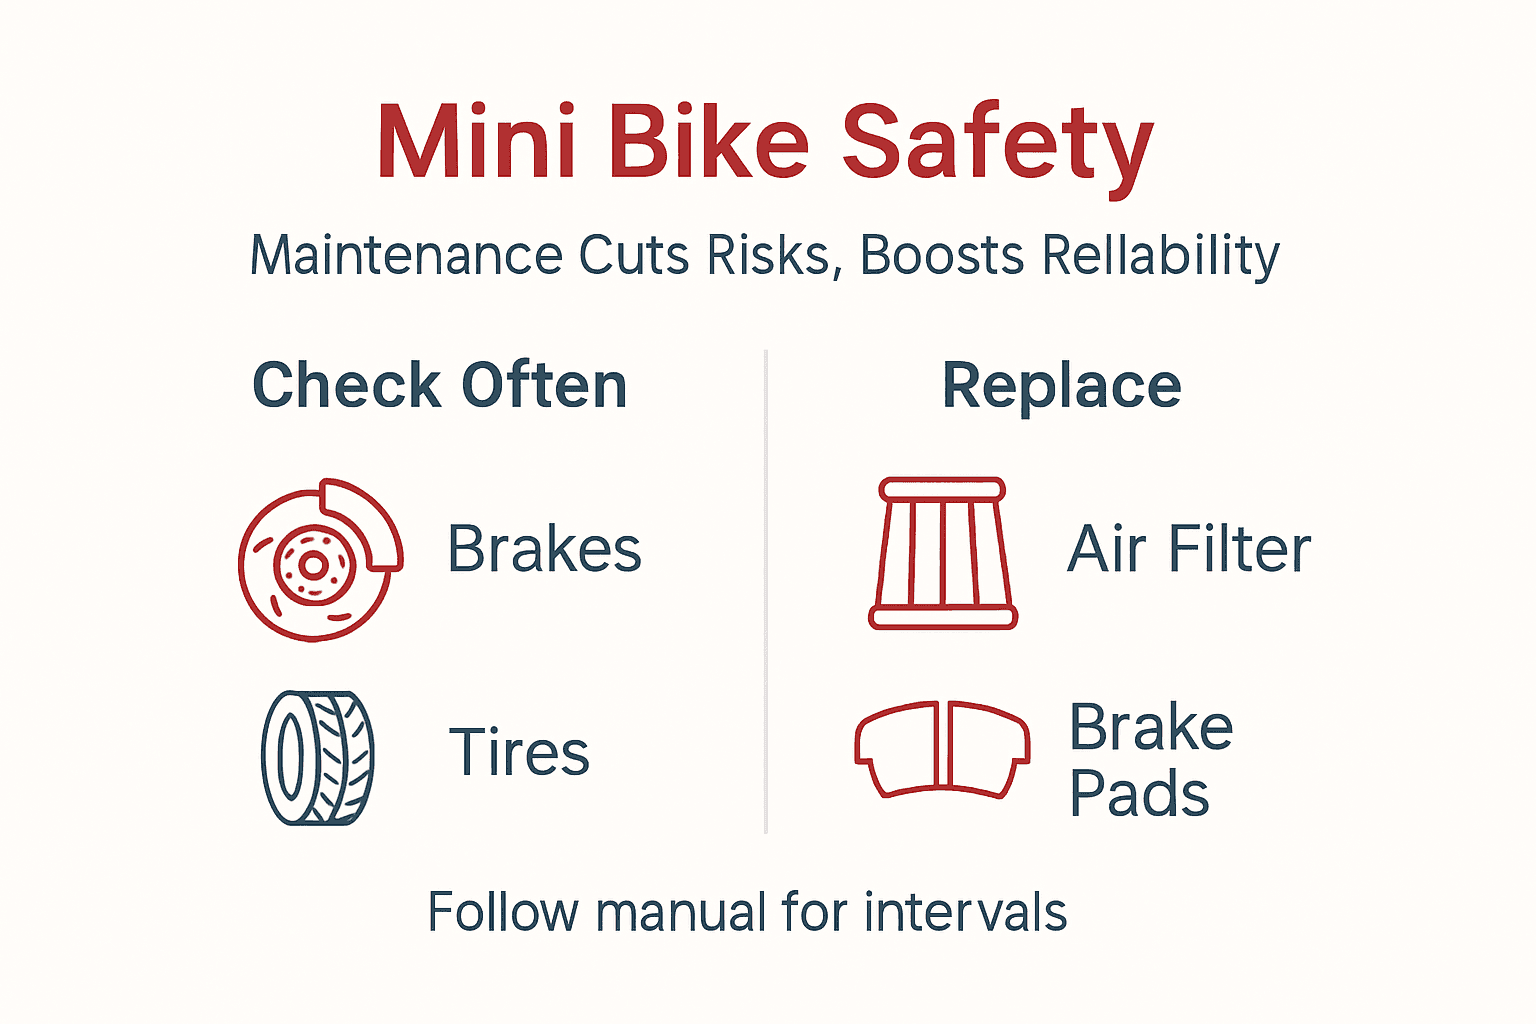
Start with the air filter, your engine’s first line of defense. Neglecting the air filter can cause up to a 30% drop in engine efficiency. Remove the filter cover, typically held by two to four screws or clips. Inspect the foam or paper element for dirt buildup.
For foam filters:
- Wash in warm soapy water and squeeze gently
- Rinse until water runs clear
- Let air dry completely for 24 hours
- Apply foam filter oil and squeeze to distribute evenly
- Reinstall once fully prepared
Paper filters can’t be cleaned effectively. Replace them every 3 to 6 months or when visibly dirty. A clogged filter starves the engine of air, causing poor performance and increased fuel consumption.
Pro Tip: Keep a spare air filter on hand so you can swap it immediately when the current one gets dirty. Clean the dirty filter for next time while riding on the fresh one.
Fuel system care varies by bike type. For carbureted models, periodic adjustment keeps the air-fuel mixture optimal. If your bike runs rough, idles poorly, or lacks power, the carburetor may need tuning. Most carbs have an adjustment screw that controls idle speed and mixture. Turn clockwise to lean the mixture, counterclockwise to richen it. Make small quarter-turn adjustments and test between changes.
Inspect fuel lines during every maintenance session:
- Look for cracks, especially near clamps and bends
- Check for soft spots that indicate deterioration
- Ensure clamps are tight without crushing the line
- Replace any questionable hoses immediately
Fuel-injected mini bikes require less frequent adjustment but benefit from fuel system cleaner added to the tank every few months. This prevents injector clogging and maintains spray patterns.
| Component | Service Interval | Estimated Cost |
|---|---|---|
| Air Filter (foam) | Clean every 5 rides, replace yearly | $8 to $15 |
| Air Filter (paper) | Replace every 3 to 6 months | $12 to $20 |
| Spark Plug | Inspect every 20 hours, replace yearly | $3 to $8 |
| Fuel Lines | Inspect monthly, replace every 2 years | $10 to $25 |
| Battery | Charge monthly when stored | $0 (electricity) |
Electric mini bikes skip fuel concerns but demand battery attention. Charge the battery every 4 weeks during storage periods to extend lifespan by 20%. Lithium batteries especially hate sitting discharged, which causes permanent capacity loss.
Check electrical connections for corrosion, indicated by white or green buildup around terminals. Clean with a wire brush and apply dielectric grease to prevent moisture intrusion. Loose connections cause intermittent power loss and starting problems.
For detailed fuel system maintenance procedures, consult your model’s service manual. Following engine starting tips prevents flooding and unnecessary wear during cold starts. Learn more about air filter maintenance importance to understand how this simple task protects expensive internal components.
Brake, Tire Care and Common Maintenance Mistakes to Avoid
Brakes and tires directly determine whether you stop safely or crash. These components wear gradually, making monthly inspection essential to catch problems before they become dangerous.
Tire maintenance starts with pressure checks before every ride. Use a quality gauge, not just a visual inspection. Tires can look fine but run 5 to 10 PSI low, dramatically affecting handling. Maintain pressure between 20 and 30 PSI based on your bike’s specifications and rider weight.
Inspect tire tread depth and sidewalls monthly:
- Tread should have visible patterns, not smooth bald spots
- Sidewalls must be free of cracks, bulges, or cuts
- Look for embedded objects like nails or glass
- Check for uneven wear patterns indicating alignment issues
Replace tires when tread depth drops below 2mm or when you see cords through the rubber. Worn tires lose grip in wet conditions and increase stopping distances significantly.
Brake inspection takes two minutes but prevents accidents. Check brake pads monthly by looking through the caliper or removing the wheel. Pads should be at least 3mm thick with even wear across the surface. If you see metal backing or grooves deeper than 1mm, replace them immediately.
Adjust brake cables to maintain proper lever feel:
- Pull the brake lever and check for firm resistance halfway through travel
- If the lever touches the handlebar, tighten the cable adjuster
- Spin the wheel and listen for rubbing, which indicates over-tightened brakes
- Test stopping power in a safe area before riding
Pro Tip: Bedding in new brake pads improves performance. Make 10 to 15 gradual stops from moderate speed to transfer pad material onto the rotor evenly.
Common maintenance mistakes cost time and money. Over-tightening bolts causes stripped threads in about 20% of amateur maintenance cases, avoidable by using proper torque settings. Invest in a basic torque wrench and follow specifications in your owner’s manual. Critical fasteners like axle nuts and engine mounts have specific torque values for good reason.
Chain tension requires the Goldilocks approach. Too loose causes power loss and increases wear on sprockets. Too tight binds the suspension and can break the chain under load. Check tension by pushing up on the bottom chain run midway between sprockets. It should move 1 to 1.5 inches vertically.
| Maintenance Mistake | Consequence | Prevention |
|---|---|---|
| Over-tightening bolts | Stripped threads, cracked components | Use torque wrench, follow specs |
| Ignoring chain tension | Premature sprocket wear, chain failure | Check every 3 rides, adjust as needed |
| Using wrong lubricants | Increased friction, component damage | Buy powersports-specific products |
| Skipping brake checks | Extended stopping distance, accidents | Inspect pads and cables monthly |
Avoid using automotive grease on mini bike chains. It’s too thick and attracts dirt that acts like grinding paste. Similarly, don’t substitute motor oil for chain lube, as it flings off at speed.
Regular maintenance isn’t optional; it’s the difference between a fun ride and a trip to the emergency room. Every component you check is one less potential failure on the trail.
Find comprehensive brake and tire care instructions specific to your model. Understanding safety comparisons between different vehicle types highlights why proper maintenance matters. Learn maintenance mistake prevention strategies that professional mechanics use daily.
Expected Maintenance Effort, Cost, and Benefits
Let’s talk reality. You’re busy, budgets are tight, and you want to know if regular maintenance is worth the hassle. The answer is absolutely yes, and here’s why.
A full maintenance session takes 1 to 2 hours and costs $20 to $60 in consumables, while reducing injury risk by over 50%. That’s less time than watching a movie and cheaper than a tank of gas. Compare that to the cost of a broken chain causing a crash or a $300 carburetor rebuild from neglect.
Typical maintenance costs break down like this:
- Chain lubricant: $8 to $12 (lasts 6 months)
- Air filter: $12 to $20 (every 3 to 6 months)
- Brake pads: $15 to $30 (yearly for recreational use)
- Cleaning supplies: $10 to $15 (monthly)
- Miscellaneous fasteners and fluids: $10 to $20 (as needed)
Time investment averages 1 to 2 hours per session when you’re learning. Experienced owners knock it out in 45 minutes. Schedule maintenance every month or after 10 to 15 hours of riding, whichever comes first. This cadence catches problems early when they’re cheap and easy to fix.
The safety benefits alone justify the effort. Regular maintenance prevents:
- Brake failures that cause rear-end collisions
- Tire blowouts at speed
- Chain breaks that lock the rear wheel
- Throttle sticking from dirty cables
- Steering failures from loose bolts
Beyond safety, maintained bikes simply run better. You’ll notice smoother acceleration, easier starting, and more consistent power delivery. Fuel efficiency improves by 10 to 15% with a clean air filter and properly adjusted carburetor.
| Maintenance Benefit | Impact | Timeframe |
|---|---|---|
| Reduced injury risk | Over 50% fewer accidents | Immediate |
| Extended component life | 2 to 3 times longer chain life | 6 to 12 months |
| Improved performance | 15% better fuel economy | Immediate |
| Lower repair costs | $200 to $500 savings yearly | Ongoing |
Think of maintenance as insurance. You’re investing small amounts regularly to avoid catastrophic failures that cost hundreds or thousands to repair. A $15 air filter prevents a $400 piston replacement. A $10 bottle of chain lube saves a $150 sprocket set.
Well-maintained mini bikes hold resale value better too. Buyers pay premium prices for bikes with documented maintenance history and clean, functional components. If you decide to upgrade in a few years, that maintenance investment pays dividends.
For busy parents juggling work and family, the 1 to 2 hour monthly commitment is manageable. Turn it into family time by teaching kids basic maintenance skills. They’ll learn responsibility, mechanical aptitude, and safety awareness while spending quality time together.
Detailed maintenance time and cost information helps you plan your schedule and budget. Review maintenance cost and effort details to understand long-term ownership expenses.
Discover Quality Mini Bikes and Accessories at GoKarts USA®
Ready to put this maintenance knowledge into action? GoKarts USA® offers everything you need for safe, reliable mini bike fun. Our selection includes family-friendly models built for durability and easy maintenance, perfect for parents who want quality without complexity.
Explore our range of mini bikes engineered with accessible maintenance points and commonly available parts. Whether you’re shopping for your first bike or upgrading to something more capable, we stock options for every skill level and budget. Our mini bike beginner guide helps you choose the right model and master essential maintenance from day one.
The TrailMaster Storm 200 exemplifies our commitment to quality and value. This Storm 200 mini bike features a reliable 196cc engine, rugged construction, and straightforward maintenance access. It’s designed for families who demand performance without complexity.
Beyond bikes, we provide the tools and accessories that make maintenance easier. From quality chain lubricants to replacement air filters, our parts department stocks everything covered in this guide. Understand family go-kart benefits to see how proper maintenance extends to all powersports vehicles.
Frequently Asked Questions
When should I perform mini bike maintenance?
Perform full maintenance monthly or every 10 to 15 hours of riding, whichever comes first. More frequent checks are needed after riding in dusty, muddy, or wet conditions. Quick pre-ride inspections of tire pressure, brakes, and chain tension should happen before every outing.
How can I tell if my brakes need replacing?
Brake pads need replacement when they’re thinner than 3mm or you feel reduced stopping power. Look through the caliper to check pad thickness, or remove the wheel for a closer inspection. If the lever pulls to the handlebar or you hear metal-on-metal grinding, replace pads immediately.
What happens if I over-tighten bolts?
Over-tightening strips threads in aluminum components, requiring expensive thread repair or part replacement. It can also crack plastic parts or warp metal surfaces. Use a torque wrench set to manufacturer specifications for critical fasteners like axle nuts and engine mounts.
Should I charge the battery if not using the mini bike for a while?
Yes, charge electric mini bike batteries every 4 weeks during storage to extend lifespan by 20%. Lithium batteries especially suffer permanent damage when stored discharged. Connect to a smart charger that automatically maintains optimal charge levels without overcharging.
Is chain lubrication really necessary?
Absolutely. Chain lubrication reduces wear by up to 40% and prevents premature sprocket replacement. Apply lubricant after every ride or cleaning session, ensuring it penetrates between rollers and side plates. Proper lubrication also reduces power loss and improves throttle response. Additional guidance is available in our comprehensive mini bike maintenance FAQ.
Recommended
- Beginner Guide to Mini Bikes: Choosing and Riding Safely – GoKarts USA®
- What Are Mini Bikes? 30% Safer Riding for Kids & Hobbyists – GoKarts USA®
- ATV vs Mini Bike 2026: 40% Safer Choice for Family Fun – GoKarts USA®
- Mini Sport Kids ATV, 110cc Gas Engine with Parental Remote Start/Kill – GoKarts USA®